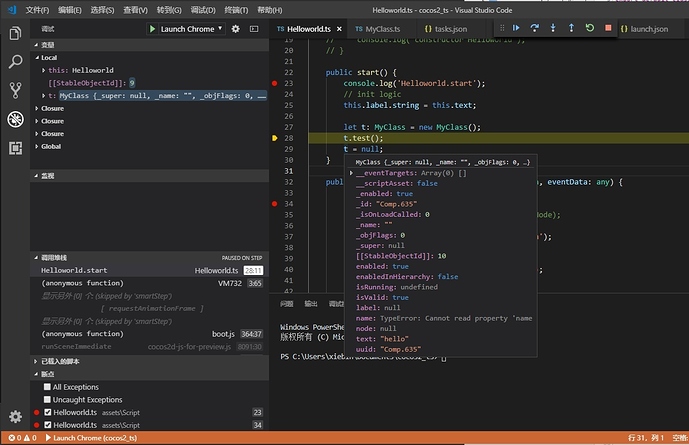
在VSCode断点调试TypeScript代码步骤!

Cocos Creator 2.1.0版本

一、 安装 Debugger for Chrome 插件
二、 配置launch.json

{
    // 使用 IntelliSense 了解相关属性。 
    // 悬停以查看现有属性的描述。
    // 欲了解更多信息,请访问: https://go.microsoft.com/fwlink/?linkid=830387
    "version": "1.0.0",
    "configurations": [
        {
            "type": "chrome",
            "request": "launch",
            "name": "Launch Chrome",
            "url": "http://localhost:7456/",
            "webRoot": "${workspaceFolder}/temp/quick-scripts/assets/Script",
            "sourceMaps": true,
            "trace": "verbose",
            "runtimeArgs": [
                "--auto-open-devtools-for-tabs"
            ],
            "userDataDir": "${workspaceRoot}/.vscode/chrome",
            "pathMapping": {
                "/preview-scripts/assets": "${workspaceRoot}/temp/quick-scripts/assets",
                "/": "${workspaceRoot}"
            },
            "preLaunchTask": ""
        }
    ]
}

三、 每次修改代码后焦点到Cocos Creator然后再切回来(我这边参考:文档 配置代码编辑环境-添加 VS Code 编译任务 总是失败,否则可以省去这切换步骤一键 F5 编译调试, preLaunchTask 就是在启动前执行的task)

TypeError: Editor.Compiler.compileScripts is not a function
   at D:\dev\CocosCreator\resources\app.asar\editor\lib\preview-server\index.js:1:2308
   at Layer.handle [as handle_request] (D:\dev\CocosCreator\resources\app.asar\node_modules\express\lib\router\layer.js:95:5)
   at next (D:\dev\CocosCreator\resources\app.asar\node_modules\express\lib\router\route.js:131:13)
   at Route.dispatch (D:\dev\CocosCreator\resources\app.asar\node_modules\express\lib\router\route.js:112:3)
   at Layer.handle [as handle_request] (D:\dev\CocosCreator\resources\app.asar\node_modules\express\lib\router\layer.js:95:5)
   at D:\dev\CocosCreator\resources\app.asar\node_modules\express\lib\router\index.js:277:22
   at Function.process_params (D:\dev\CocosCreator\resources\app.asar\node_modules\express\lib\router\index.js:330:12)
   at next (D:\dev\CocosCreator\resources\app.asar\node_modules\express\lib\router\index.js:271:10)
   at D:\dev\CocosCreator\resources\app.asar\editor\lib\preview-server\index.js:1:1318
   at Layer.handle [as handle_request] (D:\dev\CocosCreator\resources\app.asar\node_modules\express\lib\router\layer.js:95:5)

四、 下断点然后 F5 调试


存在的问题:
步骤二中配置launch.json中的 "url": "http://localhost:7456/",通过Creator预览生成url,多开时端口不一样。

喜欢在Chrome中调试的忽喷!:notes:

1赞

####这个可以的 刚入手 可以学习下

Cocos Creator 2.1.0版本

一、 安装 Debugger for Chrome 插件
二、 配置 launch.json

{
    // 使用 IntelliSense 了解相关属性。 
    // 悬停以查看现有属性的描述。
    // 欲了解更多信息,请访问: https://go.microsoft.com/fwlink/?linkid=830387
    "version": "1.0.0",
    "configurations": [
        {
            "type": "chrome",
            "request": "launch",
            "name": "Launch Chrome",
            "url": "http://localhost:7456/",
            "webRoot": "${workspaceFolder}/temp/quick-scripts/assets/Script",
    "configurations": [
        {
            "type": "chrome",
            "request": "launch",
            "name": "Launch Chrome",
            "url": "http://localhost:7456/",
            "webRoot": "${workspaceFolder}/temp/quick-scripts/assets/Script",
            "sourceMaps": true, 
            "sourceMaps": true,
            "trace": "verbose",
            "runtimeArgs": [
                "--auto-open-devtools-for-tabs"
            ],
            "runtimeArgs": [
                "--auto-open-devtools-for-tabs"
            ],
            "userDataDir": "${workspaceRoot}/.vscode/chrome",
            "pathMapping": {
                "/preview-scripts/assets": "${workspaceRoot}/temp/quick-scripts/assets",
                "/": "${workspaceRoot}"
            },
            "preLaunchTask": "mycompile"
        }
    ]
}

三、配置默认生成任务 tasks.json

{
    "version": "2.0.0",
    // See https://go.microsoft.com/fwlink/?LinkId=733558
    // for the documentation about the tasks.json format
    "tasks": [
        {
            "type": "shell",
            "label": "mycompile",
            "command": "curl",
            "args": [
                "http://localhost:7456/update-db"
            ],
            "isBackground": false,
            "presentation": {
                "echo": true,
                "reveal": "always",
                "focus": false,
                "panel": "shared",
                "showReuseMessage": true,
                "clear": true
            },
            "group": {
                "kind": "build",
                "isDefault": true
            }
        }
    ]
}

四、 下断点然后 F5 调试
调试时会先执行任务 mycompile 通知开着的Creator编译代码


存在的问题:
步骤中配置launch.json中的 "url": "http://localhost:7456/",通过Creator预览生成url,多开时端口不一样。
调试时Creator必须开着

喜欢在Chrome中调试的忽喷!:notes:

把上述launch.json和tasks.json拷贝到安装路径
\resources\utils\vscode-extension\debugger
就可以更新默认的模板,然后可以从Creator菜单中更新工程配置